To do this, you will setup a personal reason which you can learn more about here.
Let's say you're closing the office half a day early and need to block off the last five hours as being unavailable. First you'll go to Setup->Personal Reasons:

Once you've clicked on it, press "Add New Personal Reason" up top as seen in the screenshot below:

Add a name for the reason you'll be out and set the duration:

Hit Next and enter the locations it applies to:

Hit Next one more time and then you'll select the staff it applies to:

Once you press save, you will be able to add a "Personal Reason" to your calendar by going to Main->Holiday Vacation and pressing "New Holiday"

Fill in the information for when the Personal Reason will apply and for where it will apply and your scheduler will reflect those changes. Make sure to hit Save when you're finished!

You have 3 different types of "appointments" that can be added to your calendar: Services, Classes, & Personal Reasons. Classes are group or multi-person appointment types. Services are 1 on 1 appointment types. Personal Reasons are basically private services that can be used as 1 on 1 appointments or to block time off on your calendar. You can read more about the difference between Personal Reasons and Services here.
The instructions below will show you how to block time off on your schedule using a Personal Reason.
First, see what Personal Reasons you have available:
Go to Setup → Personal Reasons and look at the "Type" column in the table that's displayed there. If you don't have any Personal type services listed there, click the "Add New Personal Reason" button to create a reason for why you'll be unavailable to take appointments.

By default, all accounts are created with "Break" and "Time Off" listed as personal reasons. They have a duration of 0 minutes because you will define how long the break or time off lasts as you are setting up the personal reason appointment with yourself.
Next, add the Personal Reason to your Calendar:
So let's say I have a doctor's appointment on September 10th at noon and will not be available to take appointments at that time. I need to block off between 11:30am-1:30pm to allot for time to get there and time to get back to the office.
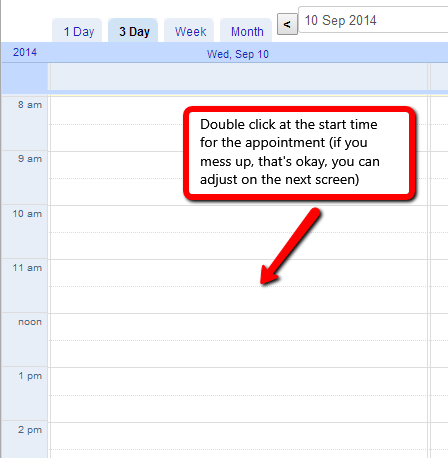
In order to block off this time, I'll go to Main → My Calendar and navigate to September 10th:

I'll double click on the My Calendar view between 11am and noon to enter into the Appointment Setup screen:
Once you've double clicked on the My Calendar view to enter into the Appointment screen, you'll see the option to define the Location, Staff, and "Service" that you're setting up this appointment for. In the Service dropdown, select the personal reason you want to add in:

Please note that you do not have to enter in a client name in the client field. This is totally optional when setting up a personal reason.
Next, customize the Appointment/Break start time and end time then press Save:

.After pressing Save the personal reason appointment for a break will be added to your calendar and no clients will be able to book an appointment with you at that time.