A. General Setup
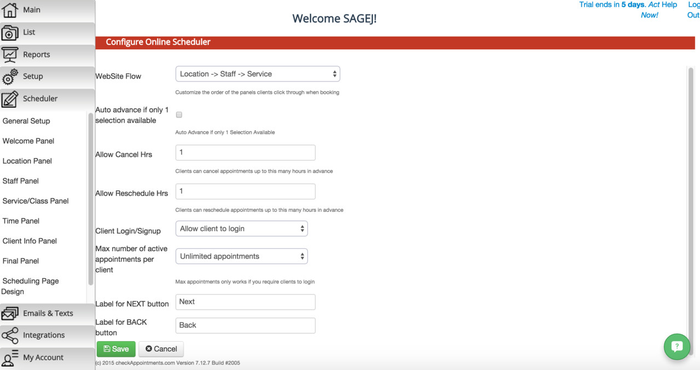
The General Setup page offers several features for customizing general attributes of your website. As you'll see in the screenshot below, you'll be able to change how your website flows, set the maximum number of active appointments per client, and more. Below the screenshot, you'll find an explanation of each feature.
WebSite Flow: This dropdown controls the order in which each of the panels display in your scheduler. You can choose to have the Location, Staff, and Service panels display in any order you'd like in addition to choosing whether or not to have either the Location and/or Staff panels display at all. The webflow options include:
- Location → Staff → Service
- Location → Service → Staff
- Staff → Location → Service
- Staff → Service → Location
- Service → Staff → Location
- Staff → Service
- Service → Staff
- Location → Service
- Service → Location
- Service
Each of the panels correspond to the Location Tab, Staff Tab, and Service Tab.
Auto advance if only 1 selection available: You can speed up the booking process for your clients with the Auto Advance Y/N checkbox. If you place a check in the checkbox, then for panels that only have 1 option available such as 1 Location or 1 Service, then those single options will automatically be selected and your clients will pass by those panels.
For example, let's say you have the following:
- 1 Location - "The Atrium on 25th"
- 2 Staff - Janice McCorkle, Tim Smith
- 1 Service - "Resume Review"
If your webflow is set as: Location → Staff → Service. Since you only have 1 Location, then your clients will bypass this panel and see the Staff panel first since you have 2 staff members. After your client chooses the staff member he or she wants for their service, then they will automatically be selected for the Service "Resume Review" since it is the only service offered. This will speed up the time it takes for them to get to the "Your Information" page so that they can enter in their information and schedule the appointment.
Allow Cancel Hrs: This field allows you to specify how far in advance cancelations must be made.
Allow Reschedule Hrs: This field allows you to specify a how far in advance a reschedule must be made.
Client Login/Signup: This dropdown controls whether or not your clients are able to login to your web scheduler. There are benefits for allowing your clients to register on your scheduler and login that you can read more about in our Client Scheduler Login documentation. The 4 options that the Client Login/Signup dropdown provides are:
- Don't show the option to login: This option will not show clients the option to login to your scheduler
- Allow client to login: This option will allow your clients to login to your scheduler where they will be able to manage their appointments and also avoid having to re-enter their information on the "Your Information" screen.
- Clients must login to book: With this option, it will be mandatory for your clients to login to your scheduler for them to be able to book appointments with you.
- Only pre-registered clients may book: With this option, only clients whom you've added to your checkAppointments system will be able to schedule appointments with you.
Max number of active appointments per client: You'll only be able to use this dropdown if you require your clients to login. This allows you to set the number of active appointments that your clients can hold with you. The options are:
- Unlimited appointments
- Only 1 active appointment at a time
- Only 2 active appointments at a time
- Only 3 active appointments at a time
- Only 5 active appointments at a time
- Only 10 active appointments at a time
Label for NEXT button: The field allows you to enter the text for the NEXT button if you would like to use different text, such as for example "Continue"
Label for BACK button: The field allows you to enter the text for the BACK button if you would like to use different text, such as for example "Previous"